Author Archives: admin

MS Teams with OBS for Teachers

MS Teams is being used more in teaching situations and I’d like to share how I integrated using OBS to provide a smoother and more professional experience for my students.

Firstly the issues that I wanted to tackle with MS Teams were mostly how slow it is switching between displaying application windows that I want to share. I also wanted to be able to display application windows side by side, Having a company logo on the screen, animated reactions, banners etc.

Firstly OBS, When you first install it is a bit enigmatic. You need to create “Scenes” which are a collection of “Sources”.

obs scene 1

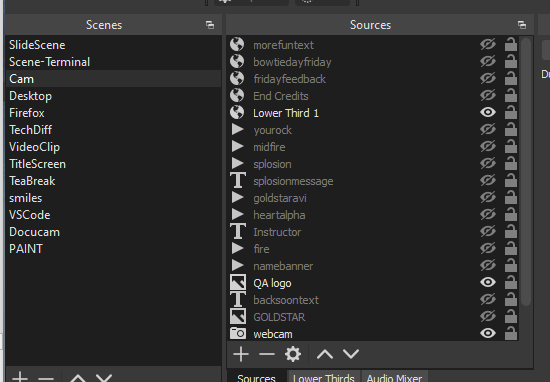
e.g. I have a scene called “Cam” which has a “Video Capture Device” source called webcam.

obs scene 2

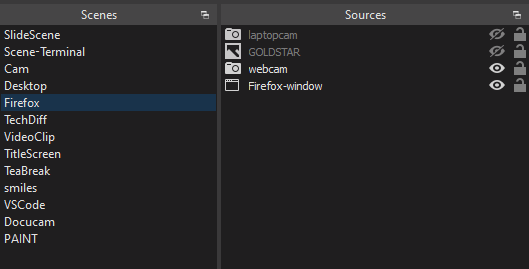
A “Firefox” Scene which has a “Window Capture” source for Firefox and a copy of the webcam source from the Cam scene. Switching between the scenes changes what is displayed.

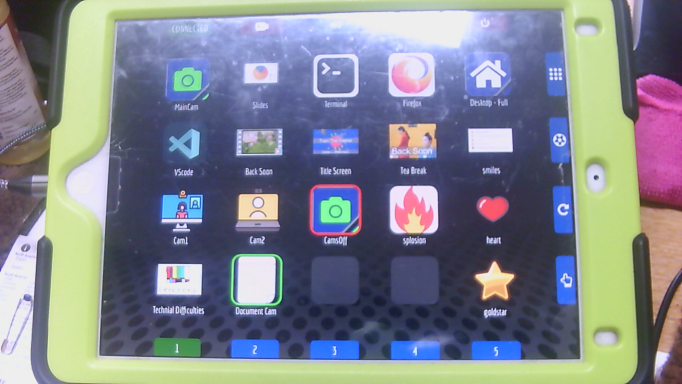
To quickly change between scenes I use a tablet running a piece of software called UpDeck which is a software Steam Deck and can run on a tablet or mobile phone. At the time of writing I use it on an old iPad Air with iOS 12.5.5. It’s main feature is to enable you to quickly switch between OBS Scenes. It’s fair to mention that the UpDeck apps are currently unmaintained, but there is a helpful community on Discord.

ipad with updeck

It requires a companion application to run on the workstation and a script to be installed into OBS which is all documented here:

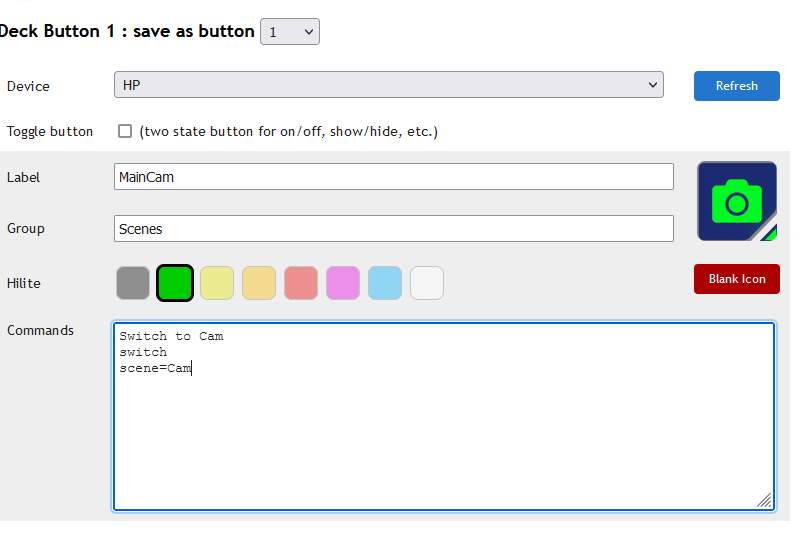
UpDeck is capable of many things but I typically limit it to switching scenes and changing the visibility of items in scenes. Grouping buttons together helps you remember which scene you have selected as the hilight on updeck can only be around one.

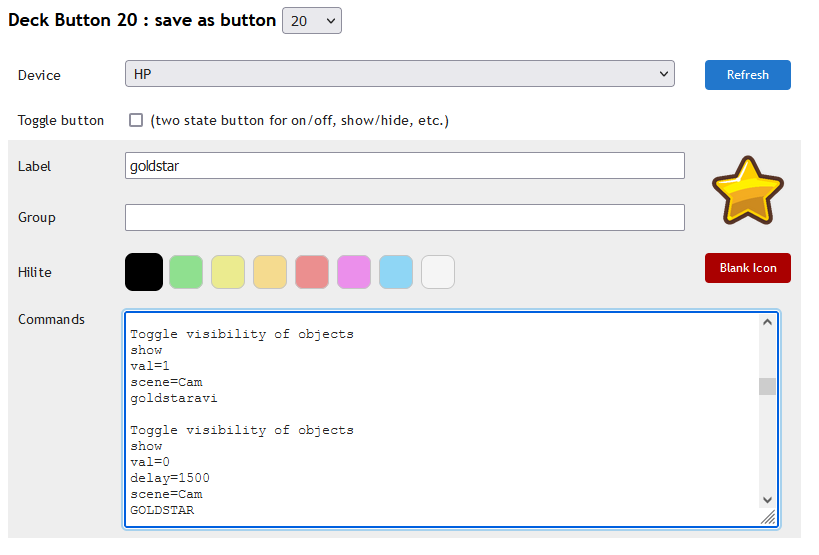
For instance the gold star source that can be seen in the sources above is made visible for a few seconds when I press the goldstar button at the bottom right of the updeck screenshot.

showing a gold star animation for 1.5s on updeck

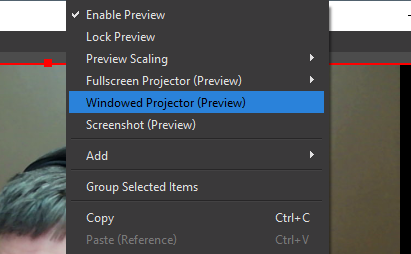
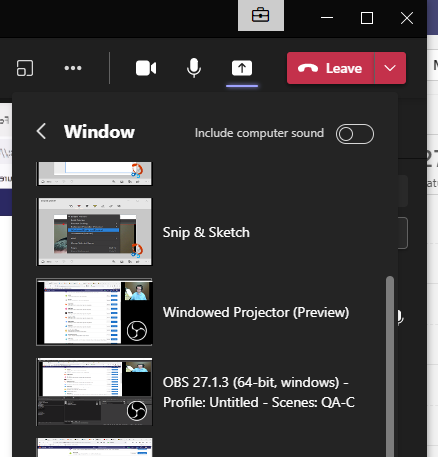
Finally you need to get all this into Teams. By far and away the highest quality method is to open a Windowed Projector view of OBS by right clicking on the preview. I maximise the window on my secondary screen and set it behind other windows. then I select the Windowed Projector to be shared in Teams.

obs window projector
selecting a share source

ClearOS LDAP and remote clients.

ClearOS is a great server with multiple management web based management tools. It also has an OpenLDAP directory server and I needed to make it work for another PHP app in my LAN. Now, getting apps to use ClearOS Directory server is not too bad if your running on a localhost install, but remote access is difficult. All the information you need is out there but not all in one place. Here is what I learned.

I wanted it to be done with TLS, more for my own satisfaction than anything. TLS works best if you have a certificate that matches the DNS record of your server. I started by creating a self signed cert with openssl. There are many ways to do this but I used:

openssl req -x509 -newkey rsa:4096 -keyout ldapkey.pem -out ldapcert.pem -nodes -days 3650

Answer the qustions however you like but remember the CN should be your ldap server DNS name.

Next task is to get slapd to use the cert. In /etc/openldap/slapd.conf I set

TLSCACertificateFile /etc/openldap/cacerts/ldapcert.pem
TLSCertificateFile /etc/openldap/cacerts/ldapcert.pem
TLSCertificateKeyFile /etc/openldap/cacerts/ldapkey.pem
TLSVerifyClient never

and put the cert files generated by openssl in the appropriate places.

In order to get slapd running I also had to comment out lines like

#TLSCACertificatePath /etc/pki/nssdb
#TLSCertificateFile Server-Cert

Then on the ClearOS Dashboard you need to set the Directory Server Publish Policy to ‘Local Network’

On the client most tools will be querying the openldap config. For Fedora, which was my client OS, that is in /etc/openldap.

Firstly I needed to install the ldapcert.pem file into /etc/openldap/certs.

Next you need to create a symlink with the name being the hash of the cert. Fortunately there is a tool and running cacertdir_rehash /etc/openldap/certs will do the job for you.

Next in /etc/openldap/ldap.conf you need to add some lines

TLS_CACERTDIR /etc/openldap/certs

There is a lot of nonsense on the internet suggesting the use of TLS_REQCERT. I’d suggest your read the ldap.conf manpage because it seems no-one else has.

Mine is using ‘demand’ (the default) with a self signed cert and is fine.

In order to test Apaches ability to let a PHP app connect to an LDAP server I slightly modified php script from http://php.net/manual/en/function.ldap-bind.php

[php]

<?php

// using ldap bind
// ldap rdn or dn

$ldaprdn = ‘<ClearOS BIND DN>’;

// associated password

$ldappass = ‘<ClearOS BIND PASSWORD>’;

// set the script to print debug info

ldap_set_option(NULL, LDAP_OPT_DEBUG_LEVEL, 7);

// connect to ldap server
$ldapconn = ldap_connect("ldaps://<servername>:636")
or die("Could not connect to LDAP server.");

//set php_ldap to use ldapv3 as default is v2

ldap_set_option($ldapconn, LDAP_OPT_PROTOCOL_VERSION, 3);

if ($ldapconn) {

// binding to ldap server
$ldapbind = ldap_bind($ldapconn, $ldaprdn, $ldappass);

// verify binding
if ($ldapbind) {
echo "LDAP bind successful…";
} else {
echo "LDAP bind failed…";
}

}

?>
[/php]

and you can test your client configuration by running php-cgi -f .php

It has LDAP debugging on so you will be able to read all sorts of output to do with the TLS connection which I found immensely useful. You should also test it by hitting the webserver too by putting the script in the webroot and running curl 127.0.0.1/filename.php If you are getting errors here then check the webserver and php logs.

Finally, I was using php-fpm on my rhel server, it has a seperate php-fpm.service that needs to be restarted along with httpd to pick up any new openldap reconfiguration on the client. Also if you are running selinux in enforcing mode you will need to run
setsebool -P httpd_can_network_connect 1

Playing with Openshift Online Starter 3 – Installing Ampache

Heres a blog outlining how to run Ampache in the Openshift Online Starter 3 platform. It assumes a degree of familiarity with Openshift and it’s resources.

First, in a new project, create a new PHP 5.6 application from the Ampache git repo. In the advanced options enable TLS.
Then, using add to project menu and browsing the storage catalogue, add a mariadb with persistant storage.

When the pods are ready navigate to the exposed route for ampache and run the Ampache deployment wizard which will create the ampache.cfg.php file. You will need to know the mariadb secrets for the root account password and the user.

When it’s all running review the ampache.cfg.php file in the ampache pod by using the terminal. At this point if the pod goes away for any reason (scaling to 0 or node errors) the config file will be lost.

Create a config map with a key named ampache.cfg.php and put the contents of the config file in the pod in the key value. I copied the config file from git and manually made the changes as it’s only the db information that needs to be changed.

Scale the ampache down to 0

Edit the deployment configuration for ampache app to add a config file a volume. the mount point for my pod was /opt/app-root/src/config. Note that if the other files that are existing in that directory are missing Ampache will still run as they are only used as templates for headers.

Saving the config will cause a new pod to be built. I had issues with getting the new pod running due to the small quota limit in the free starter account which is why I would recommend scaling the existing pod to 0 before the deployment build is running. Then, when the deployment has finished, rescale the ampache pod back up to 1.

Notes:

I would expect it to be possible to create the mariadb deployment and the config map before the ampache build but I’m not sure how the database would be populated in that scenario.

You can’t really expect to put any music in the deployment of the free account as you only have one persistent volume and that’s being used by mariadb. Ampache allows you to have another ampache instance as a music source and I used that to test. You could possibly put some music in the ampache pod but only have 1 GiB of space you’d have to keep doing it on every pod deployment. To do it at deployment you’d need to have the music in the git repo that you clone the code from. Also there will be no transcodeing.